

Will it fit?
Four measurements and four minutes to settle it!
It's the difference between the right size arriving and the wrong one.
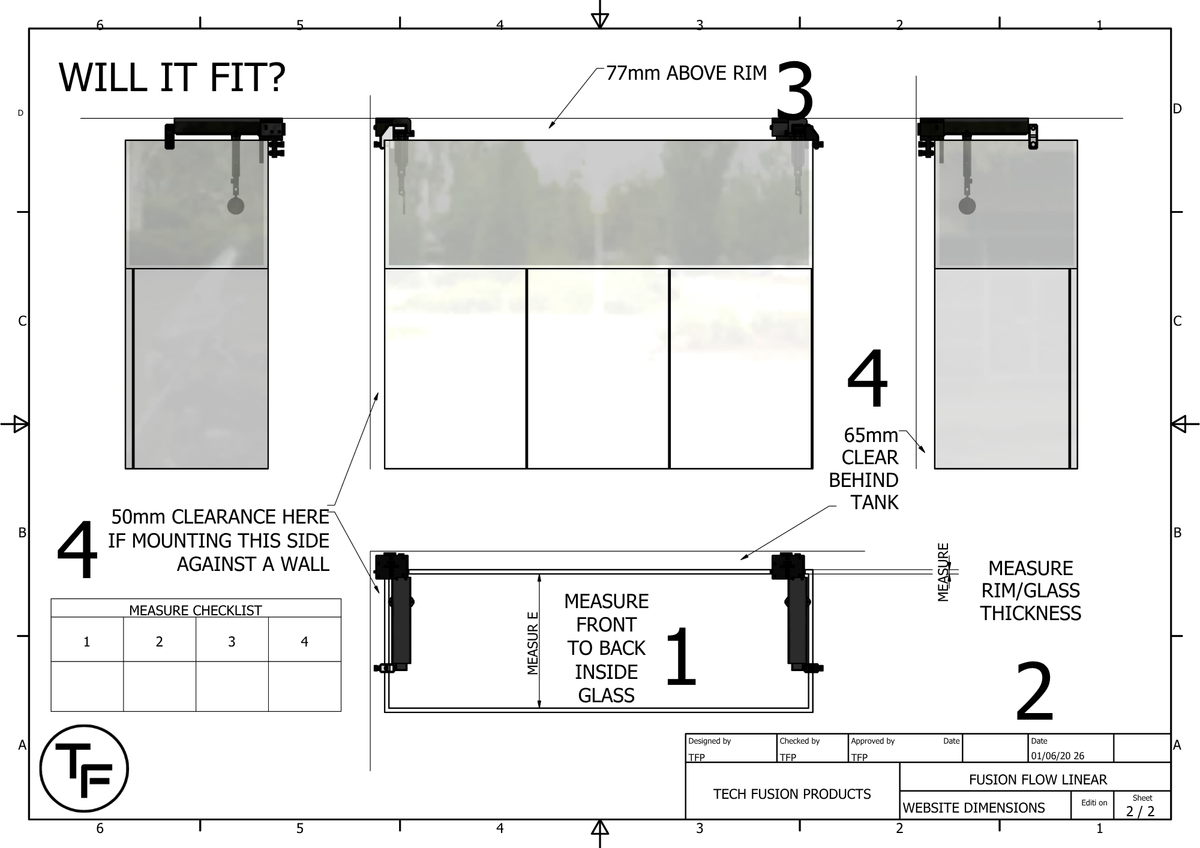
(Please use the dimension drawing below as an aid)
-

1. Front to back, inside the glass
Measure across the top of the tank from the inside face of the front pane to the inside face of the back pane. This is the one that picks your model. Fusion Flow mounts on the back rim and reaches forward, so this is the span it has to work within.
-

2. Rim thickness
The clamp takes panels from 9 mm to 30 mm, glass or acrylic. Measure the actual panel, not the trim. If your tank has a plastic eurobrace or a wide top trim, measure that instead and tell me what it is — I'll confirm before you order.
-

3. Clearance above
You'll need 77 mm of headroom above the rim for the unit itself, plus enough room above that to lift the cover off — the four-weekly service is done in place. Check your lighting mount and any hood or cover glass.
-

4. Clearance behind
You'll also need 65mm behind the unit. If things are tighter than that, contact me, as additional adaptors can be made.
If you are up against a wall on a side pane of your aquarium, also check 50mm of clearance here


Measurement drawing download
Here are the PDF Drawings for the required measurements and general clearance information.
If anything is still unclear, feel free to contact me.
Some common tanks
Find your tank below, then measure yours to confirm. The spans come from manufacturers' published dimensions, not my measurements, so they're a good starting point, not a guarantee.
Red Sea
Waterbox
Evolution Aqua and D-D
Measure yours anyway. These spans are worked out from manufacturers' published external dimensions and glass thicknesses, not measured by me — so treat them as a starting point, not a promise. Not listed? Send me the make and model and I'll tell you.
Not listed or still have questions?
Send me your measurements, and I'll tell you which one fits.
430 or 470?
On the biggest tanks both will fit. The question is how much of the tank gets swept.
On a tank around 610 mm front to back, the 430's carriage travels across about 70% of the span and the 470's about 77%. The rest, at each end, is where the drive and electronics sit. It isn't wasted space, but it isn't sweep either.
Under 600 mm front to back — the 430. The 470 won't fit.
640 mm or more — the 470, with room to spare.
Between the two — either works. The 430 saves you £60; the 470 travels 40 mm further.
If you're on the fence, take the 430. It's the more forgiving fit, and 40 mm of extra travel is not what makes this work — moving the origin at all is.
Why nothing bigger than 470?
The housing prints in two halves. Longer would mean three, which puts a second joint into the part carrying the linear rail — and I'd rather have a shorter sweep than a less rigid one. That's where 470 comes from.
If your tank is eurobraced
A eurobrace is a glass ledge bonded inside the top edge to stop the panes bowing. Whether it gets in the way here comes down to one question: does it run along the back?
The unit clamps to the rear rim, so it needs the inside face of the back glass clear. If the back is braced, the standard clamp can't reach past it. If the back is open — which some makers do, bracing the front and the two sides only — the rear clamp lands normally, and what's left is the front support, which has a ledge of glass where it expects an open rim.
A eurobrace clamp variant is in development. Before you order, measure your brace — how wide it is, and whether it runs along the back — and message me. I'll tell you where it stands for your tank.
Red Sea REEFER G3, 425 and above.
Braced along the front and the two sides, about 79 mm wide, with the back pane bare. So the rear clamp is fine on these, and it's only the front support waiting on the variant.
Where your overflow weir sits
The unit clamps to the rear rim at one end of the tank and sweeps front to back, so a weir only matters if it is in that end.
Central weir — no problem. That is the common layout on reef-ready tanks, and the unit sits to one side of it. You can run one at each end.
Corner or end weir. It occupies exactly where a unit wants to go. Put the unit at the other end. If you were planning two, one end is out unless there is clear rim outboard of the weir — worth measuring and letting me know before you order.
Full-width rear overflow. This works — you just measure differently. The clamp lands on the weir wall rather than on the back glass, so the drive end sits over the weir instead of behind the tank. Check the weir is at least 65 mm front to back, and in return you need no clearance at all behind the cabinet. The sweep itself stays entirely over the display.
What changes is the number you order from: measure front glass to the weir wall, not the full depth of the tank. On a shallow display that can put you a size down, or below the smallest unit — so that measurement comes first.
One measuring note that covers all three: the figure that picks your model is the display area, front to back, at the end where the unit will actually sit. Not the outside of the tank, and not down the middle.
Tight behind the tank?
Red Sea ask for at least 100 mm behind a REEFER — for cable access and airflow, not for the tank — and most makers don't publish a figure at all. In practice people leave more than 100 mm, because that's what it takes to get an arm and a tool back there. So the 65 mm the standard mount needs is already there on the great majority of tanks.
This section is for the ones where it isn't: an alcove, a peninsula pushed against a wall, or a tank that went in tighter than the manual asked for.
I'm developing a kit that moves the primary clamp off the back rim and onto the side glass. The front support already sits there, so both ends would hold the same pane — and because a clamp on the side rim can sit anywhere along it, you choose how far back the unit goes instead of the back glass deciding for you. Pushed fully back the drive end overhangs by around 30 mm, less once your glass thickness comes off it. Bring it forward a couple of centimetres and it sits flush, with nothing behind the tank at all.
The trade is where the sweep lands. Move the unit forward and the whole travel comes forward with it, so you buy clearance at the back and give up a little reach behind the rockwork. That's a judgement about your own aquascape rather than a number I can put in a table, which is why choosing a size for this kit is a conversation rather than a lookup.
It isn't finished and those figures are targets, not final. If your tank is tight behind, message me with the gap you've actually got and I'll tell you where the kit has got to.
Does it shade the tank?
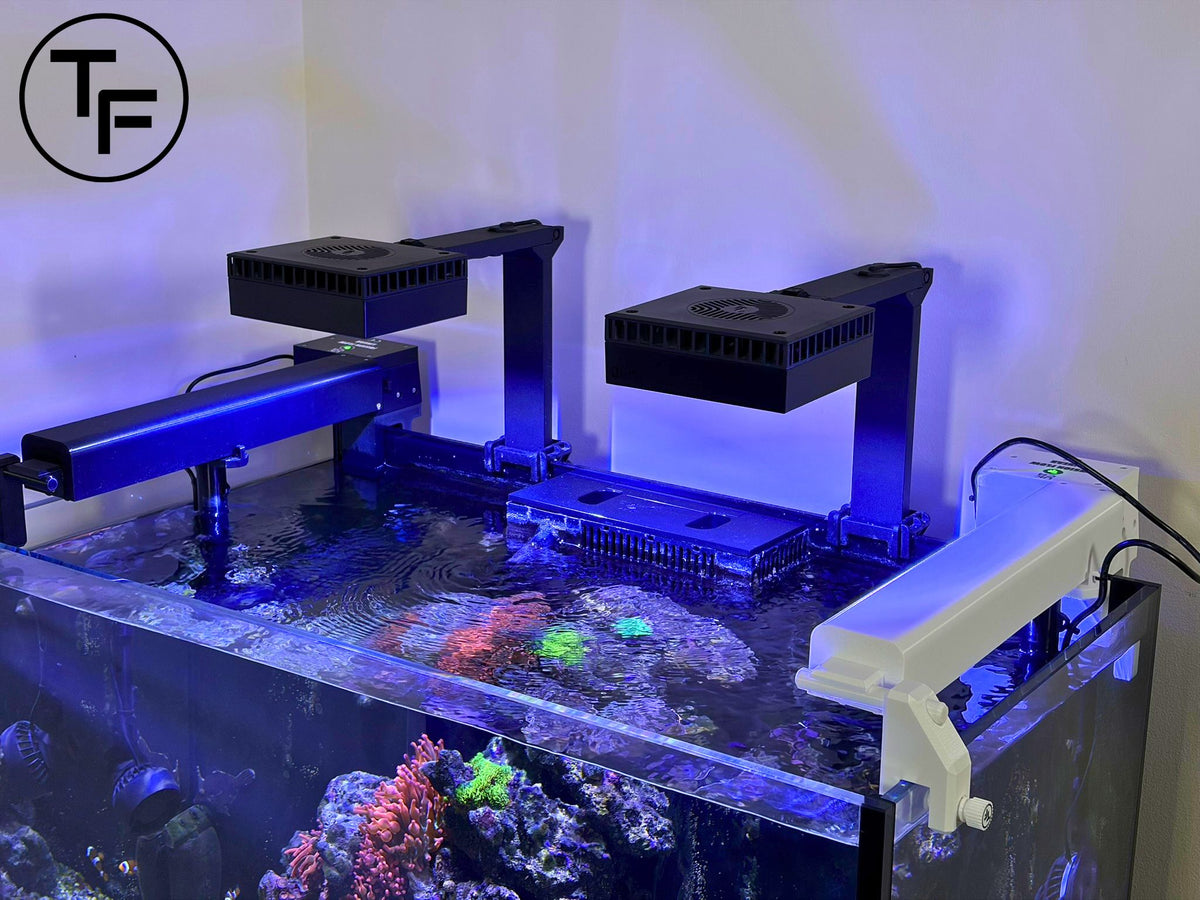
In plan the unit is about 65 mm wide and runs front to back at one end, tight against the side glass. That strip is already the dimmest part of any reef tank before anything is mounted over it, so on most setups it makes little practical difference to what reaches your corals.
The arm and pump hang below and travel with the sweep, so whatever shadow they cast moves with them. Nothing underneath sits in shade continuously.
What's left is the rail itself, and whether that matters depends on your fixture. A spread lens, or two units over the tank, will fill in around it. A single point source mounted high and directly above that end can throw a soft shadow down the side. Moving the fixture along, raising it, or fitting the unit at the other end all sort it, and none of them cost anything.
I didn't change anything on my own tank — a Red Sea Reefer 250 G2, which has two units over the water. That's the easy case.
You can see the answer before you order.
Cut a strip of card 65 mm wide and as long as your tank's front-to-back measurement, lay it flat across the rim at the end where you'd fit the unit, and turn the lights on. What lands below is the shadow, near enough. It costs a piece of card and five minutes, and it beats guessing.
-
 Fusion Flow Linear 230 - 230mm Sweep Reef Flow SystemFusion Flow Linear 230 - 230mm Sweep Reef Flow System
- Regular price
-
£229.00 - Regular price
-
- Sale price
-
£229.00
Quick view
-
 Fusion Flow Linear 330 - 330mm Sweep Reef Flow SystemFusion Flow Linear 330 - 330mm Sweep Reef Flow System
- Regular price
-
£279.00 - Regular price
-
- Sale price
-
£279.00
Quick view
-
 Fusion Flow Linear 430 - 430mm Sweep Reef Flow SystemFusion Flow Linear 430 - 430mm Sweep Reef Flow System
- Regular price
-
£339.00 - Regular price
-
- Sale price
-
£339.00
Quick view
-
 Fusion Flow Linear 470 - 470mm Sweep Reef Flow SystemFusion Flow Linear 470 - 470mm Sweep Reef Flow System
- Regular price
-
£399.00 - Regular price
-
- Sale price
-
£399.00
Quick view


An automatic discount applies to two units of the same size at checkout.
Built to order — up to 4 weeks. Free UK delivery by Royal Mail Special Delivery — signed for and insured.
Want to know how it works
Please review our How it works page for all the details.
Find out what pumps are compatible
Please review our Compatible Pumps page for all the details.